Saturday, August 24, 2013

Hairstyle : Copy the hairstyles of ' Game Of Thrones' easily !

Hey everyone :)


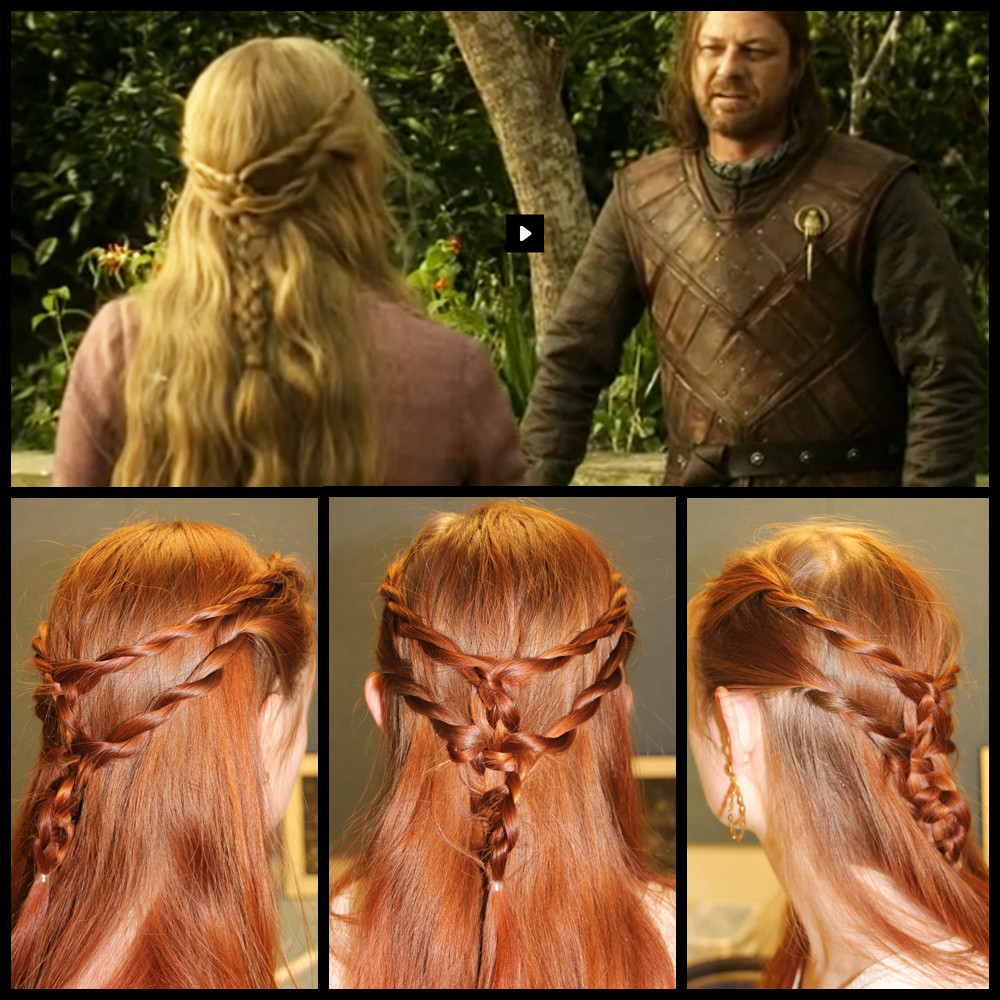
Today's article is composed after a special request ! It's about hair and here you will see some easy photo tutorials to give your hair a really nice style inspired from ' Game Of Thrones' series ! As you will realise , it's not so difficult to get this style and it's simple enough to have it at school,college,work or even a ceremony ! Pick the style you like most and give it a try ! Good luck and enjoy this article ^_^ 

(This article is a photo step by step tutorial in order to avoid long texts :) )


Let's begin with  'Sansa Stark' ;) : 


Cersei Lanister


Margaery Tyrell


Melisandre


Hope you liked my article and the steps were easy for you to understand them and achieve them :) There are many familiar hairstyles inspired from G.O.T. that look nice even if you don't have extremely long hair ! Here's a hairstyle i made on a friend of mine ! ( Marianna thanx for being my model for this shot ! ) 


Don't forget to contact me for your questions,request and suggestions on Skype( irina.alexopoulou) and on my personal emails : irina.alexopoulou@hotmail.com and irina.rhoads@gmail.com 

Also feel free to like/share my blog with your friends and subscribe on my Youtube channel to stay tuned for the upcoming videos ! 


Thanks for visiting my blog ! 

Come back soon !


Hugs,


Irina :* 


Monday, August 19, 2013

Hairstyle : How to create a volume up ponytail decorated with a braid wreath

Halloooo :D 


Thanx for visiting my blog ! Today's article is connected with the previous one ( http://irina-beauty-advices.blogspot.gr/2013/08/make-up-how-to-transform-round-eyes-to.html ) as long as it's a photo step-by-step tutorial to achieve Eva's hairstyle i made on the previous article, easily on your own ! :D  

The steps are extremely easy and the result is quite stunning and can be transformed to a formal look if you choose that type of clothing ! Hope you will like it ! Here we go ! 

Here's a list of what you will need : 


1. Hair slides 

2. A fine comb

3. Schwarzkopf GLISS Hair Repair with liquid keratin for dry/damaged hair 

4. Straightening machine ( i suggest Bellissima products , the quality is really good and the price is normal ) 

5. A thick brush

6. An elastic ribbon for hair 

7. Tiny plastic (or silicone) ribbons 


Step 1: 
Put some of the liquid hair repair ( it's leave-in , you don't need to wash it out ) on your hands and apply it to your hair . If your hair have medium length the amount of the product you will use should be same as the size of a hazelnut . Brush your hair with the thick brush starting from the edges of your hair . 


As long as Eva's haircut has short sections of hair on the front side , i let them free on the front side and made the ponytail on the back side that all the hair have the same length . If you have a little longer hair sections than Eva in front you maybe make this look on the front side :) 


Step 2:

After deciding about the front look you want to have and letting free those hair sections ( photo 1 ) take the first one of those you don't want them to be free on both right and left side of your head ( photo 2 ) and make a braid on each hair section of those two ( photo 3 ) . When you are done secure them by using the tiny silicone ribbons - it would be better if they match your hair colour so that they will be invisible . After that you will have two thin braids ( one on each side ) that will be your wreath later ! ( photo 4 )


Step 3:

Seperate the upper hair sections on the top of the back side of your head , lift them up and use the thin comb to give volume to the roots by brushing them on the opposite direction that you normally do.
Then brush back gently your hair so the top won't look messy but keep the volume and use the elastic hair ribbon to make a tight low ponytail :)  TIP : let a hair section free out of your ponytail .


Step 4: 

Twist the free hair section around the elastic ribbon of your ponytail to cover and 'hide' it and then make it steady by using hair slides ( you'd better have hair slides on the same colour with your hair - in this case , Eva's hair are preety darker than mine so the hair slides i used are visible ) 


Step 5:

Take the one of the thin braids , twist it around your head and secure it with hair slides . Do the same with the other one and place it behind the first so you will have a braid weath ! 


Step 6: ( FINAL )

Use the straightening machine ( optional ) to straighten the free sections of your hair and your ponytail as well ! TIP : Use the thin comb while straightening , it will make the result more professional . 


And it's over ! As you noticed it's really easy,simple and fast and it's suitable for all the hours of the day :D Special thanx to Eva again for being my model for this hairstyle ! :) 


You can contact me on Skype : irina.alexopoulou


 or via email : irina.alexopoulou@hotmail.com
                       irina.rhoads@gmail.com
for any question,suggestion or request!
If you liked my article and blog share it
with your friends and follow me !
Till next time , Take care :*
Irina 


Sunday, August 18, 2013

Make up : How to transform round eyes to 'cat eyes' and how to complete that type of make up

Hey everybody ! :)


Today i will show you step by step a nice make up look that will give the 'cat eye' effect to round eyes . Also you can see how to combine it softly with juicy lips in a way that is suitable even for work !

If you have any question or request feel free to contact me on Skype or via email ( you will find my contact info below at the end of the article :D ) ^^ 

First of all , special thanx to Eva , the guest displayed on my article today that was my model to show you this trick :) Hope you like it ! 

So , let's get started and see what you will need to achieve this nice look step by step ! 

For the main face and eyes :                                                                                                                     
1. Garnier BB Cream Miracle Skin Perfector
2. L'Oreal True match Concealer
3. White glitter eye shadow 
4. Rose mat eyeshadow 
5. Brown eye liner
6. Triple Brown-Dark Rose-White mat eye shadows
7. Gold-Brown palette ( you will need only the Gold glitter eye shadow )
8. White eye pencil
9. Black mascara ( Maybelline New York )
10.Thick  Black eye pencil ( not displayed )


For cheeks ,highlighting and lips : 


~ Chocholate eye pencil ( radiant's tone 04 is really good as well ) 

~ Maybelline New York Rouge 

~ Big brush for the cheeks ( the bigger it is the better for the final result )

~ Giordani's Gold Powder for highlighting 

~ Clinique's lipstick dark rose colour

~ L'Oreal's transparent lip gloss 


In order to make it easier for you , i picked the 6th product from the first list and splitted it in parts so that you won't get mistook when i mention the specific colour i use , here is your 'map' :) 


Step 1 : After your cleaning routine , dry your face with a towel and apply your foundation (product 1 on the first list ) . On Eva , i used Garnier's BB Cream Miracle Skin perfector , it works really nice , looks natural and has satisfying coverage . 


 Also be sure you will use your concealer (product 2 of the 1st list ) AFTER applying your BB cream , the result will be better .
The L'Oreal's true Match concealer is been combined perfectly with your BB Cream . 

TIP ! If you have black areas below or around your eyes , combine some yellow eye shadow with your concealer and apply their mix on them ! Also if you have acne do the same trick with concealer , just replace the yellow eyeshadow with a green one !


Step 2 :

 Use the white glitter eye shadow ( product 3 ) on the whole area of your eyelid and put a little more on the inner corners of your eyes ( it will adjust light on them and prepare the corner for the cat eye effect ) . 


Step 3 : Use the 4th product , the lighter Rose eye shadow and apply it on the 3/4 of your eyelid ( avoid the first 1/4 next to your inner eye corners ) .


Step 4 :

Use the brown eye liner ( 5th product ) through the whole upper line of your eyelashes and on the 1/2 of the lower eyelashes' line ( the outter part of it ) just as displayed in the photo :) 


Step 5 : 

Use the triple pallette ( 6th product ) and specifically the eyeshadow B ( look at the map ) to make a thicker line just on the previous you made with the brown eye liner . 


Step 6 : 

As you can see in the photo below , first i took the eyeshadow C , remade the line i made previously ( the fact that you did the same thing with 3 different products will make the lines smoother and more natural ) AND THEN i made a triangle on the outer corner of each eye to make the cat eye shape . Then with the same eye shadow i filled the outer 1/3 part of the upper eyelid ( did the same with the lower one ) . Next i used the Dark Rose eyeshadow from the same palette ( eyeshadow B on the map ) and filled the middle of each upper eyelid . Avoid the 1/3 part that is next to the inner eye corners. 


Step 7 :


Use the Gold glitter eye shadow ( 7th product ) like this : put enough of it on your finger and dab gently the middle of your upper eyelid ! Then use the eyeshadow A ( white mat one ) to the area under your eyebrows .


Step 8 :

1) Use the white eye pencil (8th product) on the inner corners of  your eyes and on the inner side of your lower eyelid. 


2) Right after use a thick black pencil to highlight the 7/8 of your upper eyelashes' line and the 1/2 of your lower eyelashe's line following the angle you made previously while forming the 'triangle' on your outer eye corners . Add enough black mascara ( 9th product of the list ) .


Step 9 :

1) Use a big brush to apply your rouge across your cheeks 
2) Draw the outline of your lips with your lip pencil and make a vertical line on the middle of your lower lip ( It's the trick i mentioned on the Juicy lips article , you can find further details about it here : http://irina-beauty-advices.blogspot.gr/2013/08/make-up-how-to-make-your-lips-look-juicy.html ) 

3) Apply your lipstick by lifting your lips a little and be careful not to erase the vertical line ( look at the link i attached on step 2 for further explanation ) .

4) Add some of your transparent lip gloss on the middle of your upper and lower lips ONLY . ( you can find more about it on the Juicy lips article's link above )  

*You can optionally use the Giordani's Gold powder i mentioned above . By applying it with a large brush above your cheeks you will make the whole look fresh and light ! 


And you are done ! This is your final look ! 

Thanks again to Eva for helping me share with you this make up trick ! 

For any question or request you can find me on Skype with the username : irina.alexopoulou
or you can send me an email even with my tips on you at : irina.alexopoulou@hotmail.com
                                                                                          and irina.rhoads@gmail.com

Υou can find a photo step by step tutorial for Eva's hairstyle here ( http://irina-beauty-advices.blogspot.gr/2013/08/hairstyle-how-to-create-volume-up.html ) made by me ! Thanks for visiting my blog ! Stay tuned :D ! 


Hugs, Irina :D 

Wednesday, August 14, 2013

Skin Health : Useful tips and tricks for facial skin ( part 1 )

Hi everyone :)

Thanx for visiting my blog ! On today's article you can find a list of some useful tips and tricks for facial skin . The 'part 1' sentence between the brackets above states that a 2nd part will come soon , refering to the skin of the body . Hope you will find this article interesting and useful !

Also , don't forget to send me emails or messages with your questions,requests,suggestions and photos with you performing my blog's tips ! They are all welcome :) 


1. Always clean your face : Cleaning deeply your skin is really important not only for the beauty part but for it's health too . Use a cleaning product in any format you prefer and make sure that it's suitable for your skin . You should wash your face with it when you wake up ( so if you wear make up to go to work etc your skin will be well prepared for it and your make up will last longer ) and wash it too before you sleep at night ( afrer removing the make up ) . I use L'OREAL Paris' 'New Ideal Fresh Gel ' , it's really effective and removes completely any make up product so that i won't need to use many products , it combines everything. ( Want a review of the best facial soaps by me so you can choose yourself? Click here )


2. Use a scrub/peeling product to remove the dead cells from your skin , keep it young and clean and highlight it's natural colour :) If your skin is oily you can scrub it twice a week ( not more , you will cause dry skin effect ) . If your skin is mixed or dry you can do it once every 10 days or less if you think you have too sensitive skin . You can rather buy a peeling industrial cream or make your own home made one . A nice product for it is 
' 7 days scrub cream ' from Clinique but personally i make my own scrub cream by mixing white or brown sugar with a little spoon of honey , apply it on my face and then wash with enough water . It's suitable and works good on lips too , honey is preety hydrating . 


3. Apply a tonic lotion or your hydration cream after peeling to let your skin absorb all the vitamins of your cream . 

4. ALWAYS remove your make up before you sleep . During your sleep , the skin is awake . The importance of having a completely clear skin when you sleep is so high because at this time , your organism is trying to refresh your skin's cells so your skin needs to 'breathe'   . If you wear make
up (which will have absorbed the whole day's dust from the atmosphere and been combined with the natural skin's oil ) it won't allow your skin to breathe and close it's skin pores and as a consequence when you wake up your skin will be oily , and the possibility of watching pimples and redness areas is high. Especially, if you had a tiring day and you sleep without removing your make up , you will wake up with ' black circle ' effect below your eyes . It's really comfortable to have a cleaning and make up removing product like the one i mentioned above. Even if you are really tired , give it a try and remove all the products you applied the whole day. It worths it.

5. How to make your emergency home made make up remover :  What if you want to remove your make up and you just realised that the product you normally use is over? What if you needed to stay to a friend's house and a make up remove - product is not available? Leaving your make up on is not a solution !! You can make an easy , home made mix which will remove ANY type of make up without scrubing your skin to death just by using two simple ingredients ! Mix two parts of olive oil with one part of baby oil , use a piece of cotton and apply it on your skin . Everything will be gone at once :D If you need to use it for one day use small amount of them , otherwise you can use enough and save the final product in a bottle for using it as many days as you want .


6. How to remove the 'black circle' effect below your eyes : If the area below your eyes is extra sensitive , or you don't sleep enough you maybe suffer from this effect that makes your eyes look tired and dark . This is caused by high concentration of dead cells on this skin area and also by weak blood's cicrulation . A really strong solution to this problem is kafeine ! You can use one teabag for each eye that you will have sinked it in warm ( not boiling ) water first . Lay comfortably on a couch or something and put the teabags on your eyes for 3 minutes . I also use another nice trick which can be used eather seperated or in combination with the teabags' one , right after removing them . Put two small spoons in the freezer and let them get cold . Take them off the freezer and put them on your eyes !  


7. Sleep right !  Be sure that you will sleep enough hours and the right hours of the night !  It's really important to have a specific sleeping routine so that your organism will get used to sleep at the same time everyday and the highest possitive effects level you can on your skin :)

8. Follow a healthy diet :  Following a healthy diet and working out a little has multiple effects for your skin,body,hair etc . There are some products that affect more the skin and helps it look better in combination with all the advices above . Here's a list with the most populat of them :


- Green vegetables and carrots : Due to the vitamin A and C they include, they help to fight acne,boost your immune system ( vit A ) and keep the flexibility of your skin ( vit. C ) .

- Soja products : boosts the development of new skin cells and hydrates the skin thanks to its vitamine E. 

- Salmon : has similar effects as soja but also helps a lot on inflammation cases ( acne too ) .

- Melon : prevents collagen's damage  .

- Celery and nuts : protect the skin from the sun's damage .

- Dairy products : boosts skin's hydration ( really important during the summer ) . 


9. Drink a lot of water !  The most widely known advices that has ONLY possitive effects but it's the one that people always deny ! Water helps on :  skin's health, losing weight, cleaning the whole organism, controling body's temperature, blood's production and much more !  Give it a try ! You should drink at least 2 L per day :) 


10. Avoid the sun : 

Exposing your self to sun all the time - especially in the summer , forgetting putting on your sunscreen , not drinking enough water etc are some bad and dangerous habbits that many people have and it's emergency to stop them . The consequences are sun burnings , premature aging , dry skin , dark stains and sometimes cancer of the skin . Avoid the high exposure to sun ( at least the hours that sun is on the top 12 - 5pm ) , ALWAYS put on sunscreen  [special one for your face]* even if it's cloudy ( white skin needs higher protection so people with white skin should use that type of sunscreens ) , drink enough water and apply an after sun cream to lock skin's hydration .


* My personal suggestion for facial sunscreen is Neutrogena one's ' Ultra Sheer DRY TOUCH SUNBLOCK ' with high SPF protection ( ideal for people with white skin ) . It's format is really nice , easy to apply , quick absorption and it doesn't leave oily stains on the skin . 


11. QUIT SMOKING !!!  Make a gift to your budget , health and beauty by quit smoking ! You will notice difference from the first days and you will say goodbye to pale tired skin forever ! You will avoid the premature aging , skin stains , yellow teeth , tired and black eyes , dry skin and hair and much more ! 


12. Choose the right products for your skin type : Preety common mistake of women but affects the skin so much ! Spend some time on reading the description of a beauty product you buy . Nowdays products have been made for any skin type and especially for any case of problem you may face with it . You won't waste time by giving 2 minutes to yourself to choose the right product for you , in addition it will protect you from bad effects of a wrong product and save you from wasting money to something you won't use . 

13. Avoid alcohol : You can drink alcohol but not too much . One glass of it is enough to have a nice relaxing night . Also add wine or beer to your diet instead of alcohol . They have multiple benefits .


14 . Drink home made fruit and vegetable juices and green tea :
 Except from the vitamines you get , all those help you control your weight .


15. Keep it calm with the stress : 
Psychology is important for your health as long as hormones control everything in your body .

That was it for today too !
Hope you liked my article :D Feel free to share it with your friends and follow me to stay tuned on my blog !
Till next time see ya and take care !

Waiting for your mails at : irina.rhoads@gmail.com and irina.alexopoulou@hotmail.com
and your messages on Skype : irina.alexopoulou  

Hugs, Irina


About Me

My photo
A very multitasking elf in modern times. A molecular biologist specialized in cancer research (MSc), a marine scientist (BSc) and Fitness Coach who aims to share light and help the world. Besides academia, elven eyes stare at beauty and self improvement with separate blogs dedicated to the topic, where you can access education, tips and inspiring mindset ideas. The minimal spare time of an elf includes a lot of nature strolls, exercise, art and handcraft creation, book reading and positivity manifestation.