Saturday, December 22, 2018

Make up: TOP Easy, morning, light smokey everyday look (W7 Review)


Hello sparkling snowflakes!❆

Today I am going to show you how you can rock a soft smokey eye on a joker everyday look, worn from sunrise to sunset. For that purpose, I used W7 Eye Palette "ON THE ROCKS" and thus this article doubles as a (non-sponsored) review as well.
I will not get into the whole complexion procedure (you can find my skin care routine here and my complexion preparation here) both to avoid repetition and keep this article as short and easy-to-read as possible.

Let's put an eye on the palette first:


As the name implies itself, the shades are a combo of dark rock colours, mostly cool ones and a few neutral basic shades along with two shimmers. The best thing about this palette is that you can create (obviously) dramatic looks but also light smokey combinations to rock it all day-all night. I will use my own example to prove that a smokey look can still be casual and easy-to-wear even at work or a morning occasion. The specific shadows I used for my look are:


1. Sugar Rim
2. Cheers
3. Martini Olive
4. Magnum
5. Caracao (optional)


Once you prepare your eyelid appropriately (either use a primer or concealer set up with translucent powder to prevent grissiness), apply the shade 'Cheers' above your eyelid and expand it upwards with the help of a fluffy blending brush. Use the shade "Martini Olive" right under the end of "Cheers'' and blend the borders as smooth as possible. Create a diagonal line across the outer half part of your eyelid with the dark shade 'Magnum' and blend it gently towards the corners and upwards to blend it with 'Martini Olive' (3).

Now's time for the trick. Optionally, use the shade Caracao (5) to add some more definition on the edge of your outer corners and/or use a very thin brush to apply it across the line of your eyelashes for a smokey eyeliner effect. Use "Martni Olive" and "Magnum" to underline the lower eyelash line.

Last but not least, you need to add a few highlights to lighten up your eyes and lower down the intensity. Use "Sugar Rim" on the inner corners of your eyes and either expand it towards the middle of the eyelid with a fluffy blending brush or use "Cheers" (2) right before the middle of the eyelid. Extra tip: Make your eyes pop with white (if you are very pale) or beige (for medium-dark skin) eye pencil on your waterline. For a statement result, you can highlight your eyebrow bone with a cool-icy highlighter. I skipped mascara to keep it casual.


Another asset of this look is the easy transition from an office/morning look to a party makeup just by changing your lip colour. 

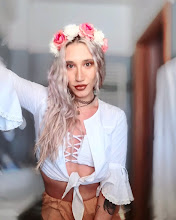
For an all day look, i went for a nude glossy lip. 

I used: 


  • KYLIE Matte Liquid Lipstick - shade #2 Candy K.

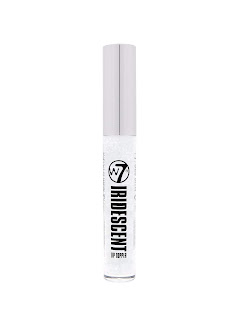
topped with 


  • W7 Iridescent Lip Topper  - shade Holo Heaven.

This is the end of today's make up suggestion.
Feel free to experiment, adjust it and get inspired to rock the best version of yourself every single day! I hope you found my article easy-to-follow. For any question/request/feedback feel free to contact me via the info provided below! Shine on gorgeous gals! Come back soon for more updates.
Kisses,
Irinä


CONTACT INFORMATION


Emails :
&
Facebook page : 
click here

Twitter :
click here

Skype :
irina.alexopoulou

Instagram :

Pinterest :

Vero: 


Wednesday, August 29, 2018

Make up: The ABSOLUTE life changer eye look.

Salute back beautiful fairies💖

Today I am gonna share with you my favourite LIFE-CHANGER make up look. Why do I call it like that? Because it is.

The most common approach on basic and "safe" make up looks orients around natural earth tones, medium to low pigment intensity and a bit of usual colour combinations to make sure that this look will look put together but still not stand out too much. Another interesting perspective I noticed around that, which in my opinion is not totally valid, is that more natural toned make up requires less effort for blending, setting and further matching. I think that the pigmentation or colour combination of the make up products do not really indicate the effort you need to put as I have seen (and tried) "natural" looking options which required A LOT of time (and product quantity) and super bold looks with minimal effort upon creation.

I am a person that I like standing out of the crowd so this look quickly became a signature one for me, but some girls prefer to keep it more quiet in daily life and reserve such a look for more special occasions, which is perfectly fine too. Wither you delve to my side or the other one, you can definitely give this a try and rock it with confidence and smile!

Another thing I LOVE about this look is that it complements ANY complexion. Regardless your hair/skin/eye colour, this combination looks absolutely stunning and you can simply not go wrong with it. At first glance it might seem a bit restrictive regarding the further matching around clothing and styling but in fact, it gives far more opportunities to experiment and express yourself than you might think. I will get back to that later on this post. On the plus side is that red is also NOT season restricting. You can combine it with different textures and fabrics to adjust it in any season, as you will notice soon.

Let's get a look into this:

Taken from my personal InstaGram account. Click on the pic for the relevant post.👄


Contents:

  • Flexibility
  • Styling Matters
  • How-to-get
  • Products I used


FLEXIBILITY

Looks very bold, doesn't it? It is. The best thing around it is that you can easily experiment and alter it depending on the occasion. 

❤For instance, you might go for a more natural eyelash look if you rock it throughout the day or keep the intensity on the eyes and go for a totally nude lip colour. 

❤For a more dramatic result you can try a darker shade for the outer corners and blend it all the way. 


❤For a more glamorous touch (especially if you are into warmer tones or your clothes/accessories are goldish) you can add a touch of golden shimmer in the center of the eyelid to put your whole outfit and make up together and pop-out!

❤If you love the result but you prefer a lighter version of it, you can easily substitute these tones with 2-3 shades lighter alternatives to keep the general idea but adjust it to your desired colour vibrancy. If you go for it, IT WORKS GREAT with champagne shimmer and highlighters. Since the final eye make up result will be more pinkish than red, the lips can either pop out with dark plum/black lipstick or champagne/golden lip gloss. Do not aim for matte lips as the eyes will be already too fair and they will appear even more silent in that case.

STYLING MATTERS

I have tried this look A LOT of times the last 2 years, in a lot of different variations, occasions and styling combos. Technically, this is how i discovered the hundred adjustments and opportunities of this look and I fell in love with it. As you already read above, there is a quite good flexibility which in turn leaves space for different clothing and styling choices. Depending on the warmth of the colour you choose for your make up you can rock both colourful/romantic or pastel/dark wardrobes. Let's see some of these opportunities to rock the day with your look.


This is my outfit the exact day I shot the photo of this makeup above. I wore this make up in the afternoon on my way to University so my outfit was more casual and comfy. Black ankle boots, blue well-fitted jeans, black leather belt (hidden underneath), white tank top and oversized pinkish knitted sweater. Black leather bag and blue/black/pink umbrella coincidentally matched my outfit that day. Since I chose a cooler tone of shimmer I kept my accessories minimal and silver toned. Leather silver choker it is.
Another way to look interesting, is to keep the colour intensity on your face and go completely neutral on your outfit. That day I chose a little lighter version of this make up (I replaced the red shimmer in the center with champagne eyeshadow) and I wore a simple white tank crop top with highwaist black pants, dark brown thin leather belt and black oxfords-type shoes. For my lips, i went for a brown-plum-beige ombre result.😃

One of my favourite picks for summer season too. This shot is taken on July 2018. I went for the "lighter" version of the red look, using red eyeliner and plum mascara. Self-made fishnet/bralette top, highwaist black pants and black leather sandals💋
Especially for summer time, while being tanned, it's an excellent opportunity to go for burgundy clothing and golden accessories.


A more spring/autumn look, suitable for medium temperatures. I can personally go out all day to this outfit. During day time i just grab on a casual sweater on neutral colour and I can simply replace it with a leather jacket for a more "nighty" look. Since the rest of the styling is pretty "quiet" colour-wise but still edgy accessories-wise, that mild warm red make up provides an interesting bridge between those two. Leather black sneakers are the key here to keep it double-sided but still functional.😊

A winter entry too! I tried to incorporate different styles, textures and fabrics to show you how it can still "work" without looking "out of season", in many different occasions. This is a very casual and simple outfit from last winter (2017), on a day that i had to go shopping, to the post office etc.. Silver metallic leggings, white Adidas snickers, woolen beige/white sweater and black woolen scarf .⛇✨


A way more "dramatic" look. That shot was taken before i go to work (bartender at Rock/Metal Club) so it had to be a little bit of "extra". For this variation i added white eye pencil on my waterline and also some black winged eyeliner on the edges of my eyelids. Warm red bright lipstick was a must and blended great with my plaid black/white/red top. This is a look which requires bolder clothing/hairstyling otherwise it will look "too pompous" if the rest of your image is too simple.🔥


I definitely hit more cold and light tones (silvery-pinkish) if I want to set this make up with a more "quiet"/romantic outfit. This is a perfect option for highwaist skirts or airy/loose dresses, floral patterns or joyful coloured picks. 🌺


HOW TO GET

As I mentioned above, one of the assets of this look is the effortless creation. It looks really time consuming but to be honest it didn't take more than 5 minutes to create the eye look and 10 minutes in total for the entire face.

*You can find a detailed list of the products I used at the end of this article


Complexion

You can either start with your complexion ( moisturizer/primer/foundation ) and follow up with eyes or, if you experience fall off effects, do it in reverse. In any case, follow your usual complexion routine. I usually keep the contour/blush factors down when I go for a bold look like this. In that case I stick with some mild bronzer across my cheekbones and that's it.


For your eye look you will need:
  • Light beige eyeshadow as a base (optional - I almost never do that - my primer works great as a base)
  • A light reddish eyeshadow - placed across the entire eyelid (maybe skip the inner corners)
  • Plum OR Burgundy darker eyeshadow for outer corners, depth and blending,
  • White/ Golden rose/ Champagne eyeshadow for your inner corners.
  • Blending brush - This will do the trick. Blend them all evenly to create a gradient horizonal result.
  • Eye tint or shimmer eyeshadow in powder, creamy or liquid format. I went for red but you can go for golden, rose or any tone you want. Place it only in the center of your already well-blended eyelid.
  • Black Mascara - choose the one with the features you prefer. Plum one works great too. I put it only on my upper eyelashes.
  • Red eyepencil (however, i used a lip pencil that i never used for its actual purpose). I used it on my waterline and also as an eyeliner and to create a sharper smokey effect on my outer edges.

The steps are exactly on the same order as stared above. If you follow this exact procedure you will end up with this final result 🌸💕 


Chapter: Lips


You will need:
Tadaaaan❤💋
  • Matte lipstick of your preference
  • Cooler and darker lip pencil
  • Lighter shimmer lipgloss or highlighter powder

There comes the tricky part as the lip colour will vary for each version of the look you choose to re-create. My most usual go-to is a cold-tone Pink Ombre. I apply some cold dark pinkish lipstick, i follow up with outlining my lips using a brownish lip pencil (slightly inwards across the lipline). I blend them both well and as a final step I add a touch of lighter liploss or highlighter powder on the center of my lips. 


PRODUCTS I USED

Complexion: 
  • Estée Lauder The Mattifier Shine Control Perfecting Primer + Finisher

  • Catrice Cosmetics 24 Hour Made-to-Stay Water Proof Make up, 005-Ivory Beige
  • MAYBELLINE FIT ME MATTE & PORELESS POWDER SUN BEIGE 


Eyes: 

  • Maybelline Eye Shadow Palette - The Nudes , Eyeshadow no. 3 - as a base
  • MAC Small Eye Shadow - colour: Matte-Red Brick as the main red eyeshadow
  • Essence Eyeshadow- Keep Calm and Berry On - as the plum darkest one
  • NYX Professional Makeup Eyeshadow Color Lid Lingerie Eye Tint - colour: "Evening Spell" - as the mid-lid shimmer
  •  Essence Get Big! Lashes Volume Boost Mascara 
  • Tommy G Smart Lip Pencil N01 - as the red eye pencil
💥IF YOU GO FOR PLUM MASCARA THE ULTIMATE RECOMMENDATION I PERSONALLY USE ALL THE TIME IS:
  • SEVENTEEN LASH ELEGANCE MASCARA 04 MULBERRY 13ML


Lips:

  • DUST+CREAM LONG LASTING Matte lipstick - NO. 500 "penelope cries" 
  • Tommy G Double Lip Pencil Water Resistant N05
  • Catrice Highlighter Powder 020 Champagne Campaign


That's it gorgeous girl! 
You now reached the end of this article, knowing everything you need to achieve this look or get inspired to create a result as unique and beautiful as you! 
Don't be afraid to stand out, embrace how special you are, wear it, own it, celebrate it! 
Have a wonderful day and I hope you will come back for more updates❤💋! 
Till then, you can always contact me to share your questions, feedback, pictures if you give it a shot, requests and anything. Find all the contact info below!

Much love,
Irinä


CONTACT INFORMATION


Emails :
&
Facebook page : 
click here

Twitter :
click here

Skype :
irina.alexopoulou

Instagram :

Pinterest :

Vero: 


Sunday, February 11, 2018

Make up: 6 TOP Eyelash Hacks of ALL TIME for Busy but Gorgeous Girls

Hello sweethearts! 

Some sparkling glitter dust fell around and the magic returned to the blog in the blink of an.. eye! 

Source: Pinterest
Certainly this eye will have the best NATURAL eyelashes in zero time, slaying all day. 

If this sounds appealing and you wish you could have the seductive look of fake lashes without the inconvenience and without spending tons of money on "exclusive" products, today's your day!

Below I present you some life hacks I personally adore to save your time (and wallet) while getting your eyelashes like a pro.


1) Homemade lash curl
Use a heated teaspoon (I heat it up with my blow dryer for around 3-4 seconds) to curl your eyelashes. This might help you to master the technique.


2) Color Time
Apply a coat of mascara across the entire eyelash length. Let it dry.


3) Spot saver
Use a business card or the spoon on your lid to prevent the mascara staining your eyelids during the application. If you still made some mess, go for a Q-tip [cotton swabs] soaked in make-up remover lotion and then follow up the spot with concealer to erase any evidence of mess.


4) Insane volume
 Now that the first mascara layer is dry, IT'S TIME TO MAKE MIRACLES HAPPEN. Use a thin brush and gently tap some baby talc powder from mid-length to the ends of your eyelashes. Avoid the roots to prevent the powder from accidentally inserting into your eyes and also let the roots "breathe". Finish with a second thick layer of mascara. The result is A Class, it will definitely make your eyes stand out and most importantly it will last all day (or night) without weighing down your eyelids.


This is me. Here I applied the hack number 5.
You can clearly see how defined and smooth my eyelashes look.
My top favourite lash option from morning to night,
from college to party.
5) The trick of waterproof Mascara

Waterproof Mascara is obviously a revolutionary product as it preserved our favourite look even during the hardest circumstances BUT it has its weak point.
It usually gets extremely dry and makes your eyelashes stuck together in big bunches. 

To prevent this, just use a regular mascara on your first layer to make sure your lashes are divided and combed and follow up with waterproof one as the top layer. 
Not only you're getting the waterproof benefit, you are also having an even color distribution and far smoother texture. 
Win-win.


6) Bring your Mascara back to life.
Two most common struggles of your favourite mascara. Getting clumpy or getting flaky. You can overcome both. Put your mascara in a bowl of hot water and let the heat restore it back to the liquid kingdom. If your mascara is mostly flaky, some drops of saline solution will save the day. Extra tip: I figured out the application works EVEN BETTER if you use a CLEAN and HEATED brush.


Source: Hello Pretty


That's it girls! Now you know how to give your eyes the stunning look of false lashes, naturally, at home without spending extra money. I have found these hacks super useful whenever I feel like getting a statement-look as they are very easy and fast to go. If you are a busy girl who loves vibrant eyes, you crave a long lasting result to keep you going throughout the entire day and you want to save your money from false lashes and eyelash extensions you can now rock it naturally without torturing your eyes. 


Please feel free to share this article with other Busy but Gorgeous girls around! We all deserve to look and feel our best❤ Your feedback, pictures as well as your recommendations and questions are very welcome! You can find all the contact information below. Leave your sign, stay tuned and have a wonderful day!
*Blinks with legendary eyelashes*
Love,
 Irina❤


CONTACT INFORMATION


Emails :
&
Facebook page : 
click here

Twitter :
click here

Skype :

irina.alexopoulou

Instagram :

Pinterest :

Tags: # pretty makeup hacks beauty eyelashes lashes mascara eyes blog blogger tutorial tricks

About Me

My photo
A very multitasking elf in modern times. A molecular biologist specialized in cancer research (MSc), a marine scientist (BSc) and Fitness Coach who aims to share light and help the world. Besides academia, elven eyes stare at beauty and self improvement with separate blogs dedicated to the topic, where you can access education, tips and inspiring mindset ideas. The minimal spare time of an elf includes a lot of nature strolls, exercise, art and handcraft creation, book reading and positivity manifestation.